Tuesday, January 31, 2012

Pitas with PIctures

Hello,

Back in December, I shared my long lost pita recipe with you.  By long, lost, I mean I lost it on the internet.  :-) 
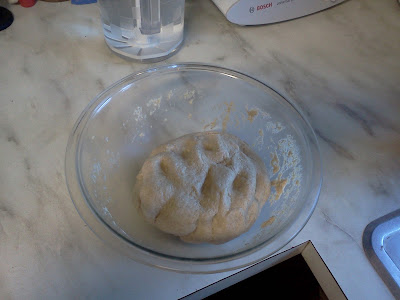
Bowl of pita dough

Anyway, I made some yesterday and they ALL PUFFED UP!  I am so pumped to have this recipe.  It is so easy and I like it as an alternative to bread in loaves. 
6 rolled out, 6 awaiting rolling, my rolling pin with the thickness bands, and my 1/4 cup of water for the oven

I also discovered if I cook them on my pizza sheets, I can get all 12 pitas in the oven at once!  You know what that means... doubling the recipe takes almost no time at all. 
All puffy

I have discovered it is all about how thick they are that makes them puff.  I was rolling them too thin before, and thus they were not puffing.  I started using my handy rolling pin bands, so I can't roll them out thinner than a 1/4" thick.

Pretty Pita Pocket!

One last comment about making pitas--Put 1/4 cup of water in the bottom of the oven when you put the pitas in, to make it all steamy in there.  For some reason, pitas like that.  :-)

ps. did you see my tiny rolling pin?  I brought my two regular sized rolling pins to a cookie party in December, and I haven't gotten them back yet.  Guess I should work on that...

Monday, January 30, 2012

Nothing to do with food...

check it out! my first successful blind hem stitch!  making curtains for the dining room. :-)


Friday, January 27, 2012

its what's for breakfast

sprouted wheat bread french toast, pan seared pears, chopped almonds with maple syrup. mmm.


Tuesday, January 24, 2012

A Catastrophic Success

Check out this video about how I made dessert on Sunday and it was almost a horrible disaster.  :-)

Monday, January 23, 2012

I Love Canning

Here is just one more reason I love canning. 

The other day, I had no idea what to make for dinner.  I was already four o'clock and I couldn't thaw anything.  I needed something quick! 

First I peeked at my food log calendar-- the calendar that hangs in my kitchen and on which I write what we eat for dinner every day.  I'm not a great plan-a-menu ahead person-- you all may have figured that out by now-- but I do like to have a record of what we ate.  This helps so much on days just like this day when I was unprepared and needed to think of something but couldn't think.  I just used a meal that I made before.  (I usually try to make something that I made more than two weeks ago, so my family isn't grumbling at me--- Lentil Shepard's Pie AGAIN??!?)...

I found it-- butternut squash soup, biscuits, applesauce.  Perfect.  Then, I went to my cabinet and grabbed:
Canned chicken stock, canned crookneck squash and canned applesauce! While the soup was cooking, my little helper and I made some quick baking powder biscuits (using sprouted wheat flour!) and I even used my cast iron griddle for a cookie sheet-- no clean up!  Yes!


ps. two cooking tips are hidden in this post!  Get a food log calendar!  And use cast iron cookware for quick, easy (sometimes little or no) clean-up.

pps. Here is my butternut squash soup recipe (more or less) in case you are interested.  I used to look up recipes for this soup but by now it has kind of morphed into it's own thing.


Butternut Squash Soup
about 4 cups butternut squash
about 4 cups chicken (or beef or turkey) stock
1/2 tsp garlic powder
1/2 tsp onion powder
1/2 tsp salt
1/2 tsp kelp powder (Salty, also has iodine, since our salt doesn't)
1/2 tsp cumin
1/2 tsp paprika
two shakes or less red pepper flakes
1/2 cup of milk, or cream (if using cream, it will come out creamy using less, too-- one time I only had about 3TBS cream and it was still delicious!)

place all ingredients except cream/milk in stock pot.  heat to boil. reduce to simmer. use immersion blender to make smooth.  taste and adjust seasonings.  add cream.  serve. 

Saturday, January 21, 2012

Homemade Butter

This evening I will be sharing a project that Chris actually undertook and completed while I was out of town. He bought the supplies, took the pictures, and shared the results.  I get to write the post.  :-)

As we have been reading Nourishing Traditions by Sally Fallon (I mentioned this in my kombucha post), we have been more convinced and convicted to really get back to the roots of our food.  We want to prepare our food from the most natural state in which it comes.  The least processed.  And prepare it in the most nourishing way.  Usually that ends up being the most 'traditional' way.

While I was gone today, Chris made butter.  mmmm.

Here's how it all went down.  He started with two quarts of organic heavy whipping cream from a local yogurt maker, Seven Stars Farm.  We actually drove out to the farm earlier this week, but the cream is only available on Tuesdays at the farm.  Luckily, Kimberton Whole Foods carries it!  It would be great to get raw cream and make raw butter, but the sale of raw butter is illegal in PA!

Next, take the cream and dump it into a (the AWESOME Kitchen Aid that Chris got me for Christmas) food processor .  Process it using the metal blade for about a minute-- until the butterfat separates from the buttermilk.


Then, take it out of the food processor, and separate the buttermilk from the butter.  Pour it into a mesh strainer and squish it in with your hands to get as much buttermilk out of the butter as possible.  Then rinse it in water. (Look at how beautiful and yellow it is!!! No extra food coloring here.)


From the mesh strainer, put it in a clean cloth and squeeze it to get the last bits of buttermilk out of the butter.  The buttermilk will spoil the butter, and that's why it's important to get as much out as possible. Rinsing with water also helps.


Finally, when you are satisfied that there was no more buttermilk in the butter, form it into a pretty ball.  :-)  and take a picture.


So, we didn't weigh the butter at the end of this, but Chris guesses that each quart of heavy cream made about 12oz. of butter. Here's the finished product:


We also bought some raw milk last week.  We let the cream separate from the milk, skimmed it off and Chris made butter out of that.  We got about 2 1/2 cups of cream from a gallon of milk, and that made about 4oz. So now, we have about 28oz. of homemade, delicious butter. Yum!

Wednesday, January 18, 2012

Kombucha!!

Have you ever heard of kombucha?

Kombucha is a fermented drink made using tea and sugar and a starter, called a scoby.  Scoby stands for "symbiotic culture of bacteria and yeasts."  Here is a little blurb about kombucha that I found at seedsofhealth website.

A couple of months ago, my mother in law gave me a kombucha scoby.  I made it once, it didn't ferment quite like it was supposed to-- when properly fermented, it gets slightly effervescent-- and I just kept putting off brewing tea to make it.  Now that Thanksgiving and Christmas have passed, and I am trying all kinds of new things in the kitchen (and also on my sewing machine!), I made time to brew some more tea to make some more kombucha.  (You would think, as I drink tea multiple times throughout the day, that I would not have to 'make time' for this.  And really, I didn't.  I was just telling myself I would have to make all this time for it and thus putting it off and putting it off... ANYway...)

Making kombucha at home could not be easier.  Seriously.  And, if you already know about this stuff and how good it is, and you already have a craving desire for it, let me save you some (a lot of) money!  Get a kombucha scoby!  I can share mine with you, if you want and you are in the area.

Ok, so here is how I have been making mine, which method I got from Nourishing Traditions by Sally Fallon.  (Great, awesome book, with lots of information and TONS of recipes covering all types of food.)  I seriously recommend this book to anyone who is serious about their health and crazy enough to think outside the conventional-food-available box.  :-)

Am I rambling a lot this evening, or is it just me?

Back to the recipe...

Kombucha
One scoby
1/2 cup of kombucha from another batch
2 tea bags
1/2 cup white sugar (I use organic cane sugar)
2 quarts of water
1/2 gallon jar

boil the water.  add the tea bags and the sugar.  stir until sugar is dissolved. let tea brew until it has completely cooled. pour tea, scoby, and kombucha into the glass jar.  cover with a cloth (and I put a rubber band around the top). leave on the counter 1 week- 3 weeks, until the kombucha is tasty and has bubbles around the edges. 
My latest batch of Kombucha-- you can see the scoby floating around in there. Actually there are two 'mushrooms' that have separated...

After a week or so on the counter, a new 'mushroom' should start forming on top of your kombucha.  It IS creepy, and looks slimy, but it is good!  It means your kombucha is working! Start tasting the kombucha, and when it tastes good to you (the longer you let it sit, the more vinegary the flavor will be), then it is ready to drink. 

You can brew another batch right away and use the scoby over again right away or store it in the fridge, with some kombucha for awhile.  Mine was in there for almost two months and it still worked when I used it this month. :-) I don't know if I will be storing mine in the fridge anymore, anyway, since the entire 2 quarts of kombucha was gone in two days at my house. 

Why drink this strange weird drink? Well, for one it tastes delicious.  It has a bit of bubbly-ness that is reminiscent of when I used to drink soda.  Also, it is packed full of B vitamins and other things like antioxidants and even more things that I don't know about because I honestly haven't looked up ALL the health benefits. :-)

Also, it's super cute to have your almost two year old say, "More kombucha, please, Mommy." :-)